
You can however add a shelfmark in the usual way (see section 111.5.2). Next the system will not show the usual add item screen, but a screen like the one below:
Description – this field is protected and contains the type of holding description.
System generated holdings – this field is protected and, if the Automatically generate flag is set, displays the holdings statement generated by the system.
Retrospective statement – enter a retrospective note summarising what you already hold for this subscription. Enter a carriage return to force a new line within the retrospective statement. This field is optional.
Automatically generate – if checked, the system will automatically build a holdings statement when issues are received, moved to a new location, etc.
Follow up statement - enter a follow up note. Enter a carriage return to force a new line within the follow up statement. This field is optional.
If you are not recording receipts or entering barcodes for this title, you may choose to just enter a statement into the Retrospective statement field and press . The system will display the contents of the Retrospective statement and Follow up statement fields in the WebOpac.

If you are recording receipts or entering barcodes for this title, you may want to turn on the Automatically generate flag so the system will automatically update the holdings statement whenever issues are received.
When the system displays a summary holdings statement it formats it to include the contents of the Retrospective statement field, the System generated holdings field and the Follow up statement field. Each field begins on a new line.
Next the system displays the Holdings statement for shelfmark sets screen:

One numbered line displays for each shelfmark set consisting of Shelfmark, Format, Type, OPAC label and Holdings statement.
Shelfmark – displays the shelfmark including the copy number from the shelfmark set.
Format – displays the physical format assigned in the .
Type – displays the Description field from the type of holding record.
OPAC label – displays the OPAC label field out of the type of holding record.
Holdings statement – multiple line display of holdings information for this shelfmark set. This holdings statement displays to WebOpac users.
[I] – create a new set for the current shelfmark. The system prompts you to fill in a Holdings statement form. If your system has the Use fixed type of holding in Holdings management turned on in AFO 469 – Multipart/serials defaults, please refer to section 111.6.1.1. If this option is turned off, please refer to section 111.6.1.2.
[*] – select one of the shelfmark sets and choose this icon to update the holdings statement. If your system has the Use fixed type of holding in Holdings management turned on in AFO 469 – Multipart/serials defaults and if the selected shelfmark set has only one type of holding, the system displays the Holdings statement form. Otherwise, you are first asked to select a type of holding from the title’s valid list and then the system displays the Holdings statement form. Please refer to section 111.6.1.1 for more details on the Holdings statement form.
[S*] – select one of the shelfmark sets and choose this icon to delete the shelfmark set. If there are receipts or barcodes attached to this shelfmark set, you are not allowed to delete it. You must choose the icon, go to the Receipt information screen and delete receipts and barcodes. When you return from deleting the receipt information, you will be allowed to delete the shelfmark set.
[H*] - select one of the shelfmark sets and choose this icon to add a new type of holding to an existing shelfmark set. This option is turned off if your system has the Use fixed type of holding in Holdings management turned on in AFO 469 – Multipart/serials defaults.
[G*] - select one of the shelfmark sets and choose this icon to update information about the shelfmark set. This information includes copy number, shelving information as well as retention, binding and discard information. Please refer to section 111.6.1.3.
[M*] select one of the shelfmark sets and choose this icon to update MARC holdings information about the shelfmark set. This information includes notes. Please refer to section 111.6.1.4.
[R*] - select one of the shelfmark sets and choose this icon to display or delete receipt information. Please refer to section 321.3.4.
[V] – use this option to receive and barcode issues for the current shelfmark. Please refer to section 111.6.1.5.
[T*] – select one of the shelfmark sets and choose this icon to change the OPAC label for the selected type of holding or to toggle the Compress holdings flag. If there is more than one type of holding for the selected shelfmark set, you are first asked to select a type of holding from the shelfmark’s valid list and then the system displays the Update type of holdings form. Please refer to section 321.4.2.
If you have the Use fixed type of holding in Holdings management turned off in AFO 469 – Multipart/serials defaults, you will be presented with this screen when you choose the or icons from the Holdings statement for shelfmark sets screen.
Note
If the title is a multi-volume or serial that you are intending to receive through one or more subscription(s), press the button. Any records created using the form below will not be available when you add your subscription(s). If the title is for a multi-volume or serial that you are not going to be receiving through Serials control, use the form below.
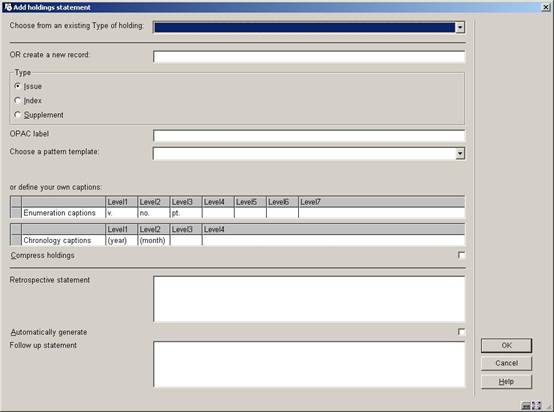
The fields on this form are divided into three sections by a _________ line.
Section 1 – allows you to link to a type of holding/publication pattern that already exists on this title:
Choose from an existing Type of holding – this is a dropdown list that contains all of the type of holdings already attached to this title. Check to see if another staff member has already entered the publication pattern information you want. If so, select that entry and proceed to section 3 of this form.
Section 2 – allows you to add a new type of holding/publication pattern to the current title. When you are finished, the new type of holding/publication pattern will be linked to the current shelfmark set and can be used by other staff members when they create other shelfmark sets for this title.
OR create a new record: - enter a unique description for the type of holding. The description cannot have been used to describe any other type of holding records on this title.
Type – select one of the three options: issue, index or supplement.
OPAC label – enter the label that displays in the WebOpac for this type of holding.
Choose a pattern template – select a previously defined pattern from the dropdown list of templates. This will give you a set of captions for numbering and chronology, applicable to a specific type of publication (daily, monthly, quarterly, etc.).
or define your own captions – alternatively you can define your own captions for numbering and chronology, specific to the publication you are adding.
Section 3 – allows you to enter information that controls the holdings statement that is produced for this type of holding/publication pattern on this shelfmark set. When creating a summary holdings statement, the system will first display the Retrospective statement, then, if the Automatically generate statement flag is set, display the System generated holdings and then display the Follow up statement.
Press to return to the Holdings statement for shelfmark sets screen.
Select one of the shelfmark sets from the Holdings statements for shelfmark sets screen and choose the icon to update information about the shelfmark set. This information includes copy number, shelving information as well as retention, binding and discard information. The following input form is displayed:

Shelfmark – display only. The location of the current shelfmark set.
Copy number – assign a copy number to this set if you have more than one shelfmark set at the current shelfmark. When the system displays the shelfmark set on other screens it will include the copy number in the Shelfmark display. For example, BD REF.123 c.1. refers to MARC21 – 852 $t, UNIMARC – 200 $n.
Shelving scheme – refer to the appropriate MARC holdings standard for valid entries. MARC21 – 852/*1, UNIMARC – 200/*1 (*1 indicates first indicator).
Shelving order – refer to the appropriate MARC holdings standard for valid entries. MARC21 – 852/*2, UNIMARC – 200/*2 (*2 indicates second indicator).
Shelving title – enter the title that is used to shelve the item. Refers to MARC21 – 852 $l, UNIMARC – 200 $k.
Copyright article fee - .this field contains the unique identification code for component parts appearing in monographs and serials. Refers to MARC21 – 852 $s, no equivalent in UNIMARC.
General retention policy – enter the general retention policy for the bibliographic item. Refers to MARC21 – 008 position 12, UNIMARC – 102 $a position 1.
The next three fields make up the specific retention policy. A specific retention policy is defined when the library retains specific parts of the item for a limited time. For example, l1y indicates that the last year of issues is retained.
Specific retention policy type - Refers to MARC21 – 008 position 13, UNIMARC – 102 $a position 3.
Specific retention policy no. of units - Refers to MARC21 – 008 position 14, UNIMARC – 102 $a position 4.
Specific retention policy unit type – Refers to MARC21 – 008 position 15, UNIMARC – 102 $a position 5.
Binding flag – if checked, this indicates that issues in this shelfmark set are to be bound.
# to bind – if the Binding flag is checked, enter the number of issue to bind in a single volume and when binding should occur. This field is for information purposes only.
Binding color – enter the binding color.
Binding notes – enter any notes specific to the binding process.
Discard flag – if checked, issues in this shelfmark set are to be discarded.
# to discard - if the Discard flag is set, Indicate the number of issues to be discarded and when discard should occur. This field is for information purposes only.
Select one of the shelfmark sets from the Holdings statements for shelfmark sets screen and choose the icon to update holdings information about the shelfmark set. This information includes copy number, physical format, shelving information, retention policy and notes about the shelfmark set. The system displays the MARC edit form for the shelfmark set. The options are the same as for bibliographic editing but the editing applies to the holdings format (MARC21 or UNIMARC) defined in AFO 159 instead of the bibliographic format.

Choose the icon from the Holdings statement for shelfmark sets screen to receive and barcode issues for the currently selected shelfmark.
If the title has more than one type of holding attached and you have the Use fixed type of holding in Holdings management turned on in AFO 469 – Multipart/serials defaults, the system displays the Select type of holding form.

Description – The system displays the type of holdings already created for this title. An asterisk (*) in front of the type of holding indicates that the type of holding is already linked to one or more of the shelfmark sets at this shelfmark. Select one of the type of holdings from the dropdown list.
Press and the system displays the Issue summary screen.
The Issue summary screen displays one line for each numbered issue for the selected type of holding. The issues listed in the grid are accessible to all shelfmarks on the title. The Copies received and Copies barcoded columns reflect the status of each issue at the selected shelfmark.

Brief bibliographic data displays above the grid. This data is protected and includes the fields defined in the !Serial element/group profile record.
Below the bibliographic data is a grid containing one row for each issue defined for the selected type of holding.
Numbering – enumeration and chronology of the issue.
Copies received – number of copies of this issue received for the selected shelfmark. If the type of holding is attached to subscriptions, you may not receive issues. The copies received column is updated either by Serials check-in or by creating an item barcode. You may enter this screen and find that copies received is greater than copies barcoded. This is because received issues need not necessarily be barcoded.
Copies barcoded – number of copies of this issue barcoded for the selected shelfmark.
[I] – use this option if the issue you are receiving is not already listed. This button is disabled if the current type of holding is attached to subscriptions. If enabled, the system displays the Add/modify issue form. Please refer to section 311.3.2.3.
[*] – select one of the issues and then use this option to receive and barcode that issue for the selected shelfmark. If the issue is already received, the system will just attach a barcode. Use this option to barcode serial issues that were received within the Serials module or to receive and barcode multivolumes. Please see below under Barcoding issues.
[R*] – select one of the issues and then use this option to receive (but not barcode) that issue for the selected shelfmark. If the type of holding is attached to subscriptions, you may not receive issues. Please refer to section . Please see below under Barcoding issues .
[N*] – select one of the issues and then use this option to change the numbering for the selected issue. . Please refer section 311.3.2.3.
[M] – use this option to change the order of display issues in the grid. Please refer to section 311.3.5.
Select one of the issues from the Issue summary screen and choose the icon. The system displays the Enter a new item form.
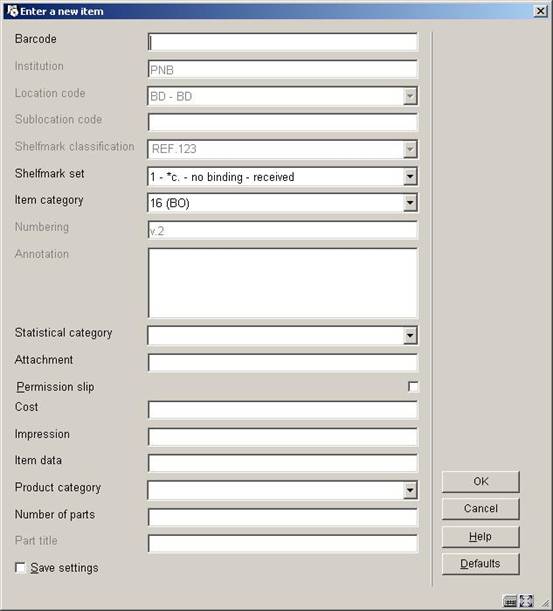
Shelfmark set – this field contains a dropdown list of shelfmark sets (for the current shelfmark) that you can attach this barcode to. For each shelfmark set in the list, the system displays a number (starting at 1 for unique identification purposes) followed by copy number (from the Shelfmark set general form), binding status (i.e. no binding versus binding copy) and receipt status (i.e. not received versus received). The system also includes one entry that is blank. Use this entry to start a new shelfmark set.
For example,

Select 1 if you are barcoding an issue already received in Serials.
Select 2 to receive and barcode the issue that belongs to the binding copy shelfmark set.
Select 3 to receive and barcode the issue for a completely new shelfmark set for the current shelfmark.
After entering the barcode, select the correct shelfmark set, item category, etc and press to create the barcode. If the issue was not previously received, it will now display as both received and barcoded. The system returns to the Issue summary screen.
Select one of the issues from the Issue summary screen and choose the icon to receive (but not barcode) the issue. The system displays the Receive issue form.
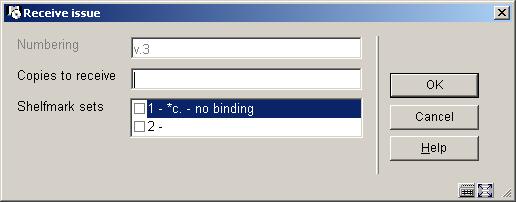
Numbering – enumeration and chronology of the issue. Not updateable.
Copies to receive – enter the number of copies of the issue that you are receiving for the current shelfmark.
Shelfmark sets – select which shelfmark sets you want to receive for. The list contains the shelfmark sets for the current shelfmark that have not received this specific issue (i.e. v.3). If a shelfmark set is controlled by a subscription,
it does not get included in the list. A blank entry is also included in the list to allow you to receive the issue for a completely new shelfmark set.
For each shelfmark set in the list, the system displays a number (starting at 1 for unique identification purposes) followed by copy number (from the Shelfmark set general form) and binding status (i.e. no binding versus binding copy).
When you press the system verifies that the value in Copies to receive matches the number of shelfmark sets you selected. If no discrepancy is found, the system marks the issue as received on the selected shelfmark sets.
Once you have finished adding all information the system returns to the List of shelfmarks screen.
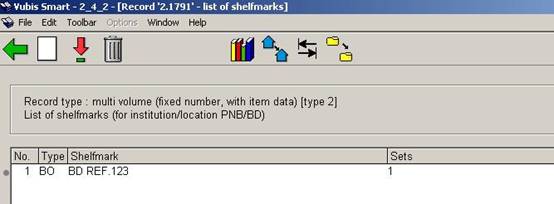
Type: the materials types of the items belonging to this shelfmark.
Shelfmark: the complete shelfmark of the items belonging to this shelfmark.
Sets: the number of sets linked to this shelfmark.
[I] - Select this option to add a new shelfmark. Please refer to section 111.6.1.1.
[*] - Select a shelfmark and then choose this option to update holdings information for this shelfmark. See section 111.6.1.2.
[S*] - Select a shelfmark and then choose this option to delete the shelfmark. This can only be done if there are no sets linked to the shelfmark.
[A*] - Select a shelfmark and then select this option to change the material type. Select the desired answer from the list.
Note
This changes the material type of ALL items linked to this shelfmark.
: to display items of another institution/location (the system can be configured in such a way that only the items of the current institution/location are shown initially).
: this option is only available in certain circumstances.
[W] - If you select this option, an input screen appears. In the input field From shelfmark enter the number of the line containing the shelfmark whose holdings data you wish to move. In the following input field To shelfmark, enter the number of the line containing the shelfmark to which you wish to move the holdings information.
Note
You will be moving ALL linked sets of that shelfmark to the new shelfmark. The shelfmark from which you moved the sets (to which now no sets are linked) is automatically deleted.
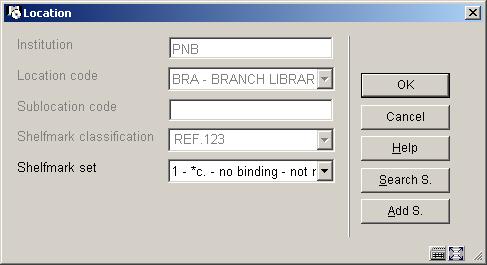
Select the icon from the Full record screen. The system displays the Item summary screen. Select one of the items and the system displays the Item detail entry screen. Select the Location field and the system responds by displaying the Location form.
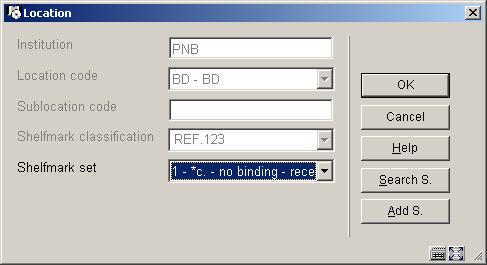
Shelfmark set – displays a dropdown list of shelfmark sets at the current shelfmark that you can move this item to. If the item was received through Serials control, you will only see one shelfmark set in the list. For each shelfmark set in the list, the system displays a number (starting at 1 for unique identification purposes) followed by copy number (from the Shelfmark set general form), binding status (i.e. no binding versus binding copy) and receipt status (i.e. not received versus received). The system may also include one entry that is blank. Use this entry to start a new shelfmark set.
If you wish to move the item to another shelfmark on this title use either the (search shelfmark) or (add shelfmark) button depending on whether the shelfmark you are moving to already exists on the title. Regardless of which option you choose, the system redisplays the Location form with the newly selected shelfmark.
Now press to move the item to the new shelfmark.
The system behaves in the same way as with publication type 4.
When you choose type 3 it is not possible to use the option to add items. In that case the following message will be displayed:
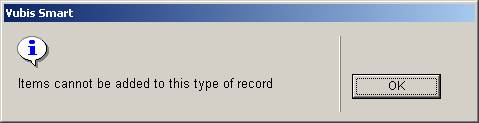
You can however add a shelfmark in the usual way (see section 111.5.2). Next the system will not show the usual add item screen, but the holdings statement form. See section 111.6.1.1 for more information.
The system behaves in the same way as with publication type 3.
·
Document control - Change History
|
Version |
Date |
Change description |
Author |
|
1.0 |
unknown |
creation |
|
|
2.0 |
July 2006 |
major rewrite of holdings maintenance for release 2.4.2 serials modifications |
|
|
3.0 |
March 2007 |
Added info on cataloguing permissions; authority searching |
|
|
4.0 |
November 2007 |
added info on use of Z39.50 when copying records to local database delivered as part of 2.4.2.4 updates |
|